You might be wondering that there is no option to view the history of the conversions which were made from transaction BDLS. To check the logs follow the below procedure,
1. Goto transaction SLG1
2. Object: CALE
3. SubObject: LOGSYSNAME
4. Enter the Date Criteria and Hit F8.
Thanks,
Kamesh
About Me

- Kamesh
- I'm an experienced SAP NetWeaver Administrator with 4 Full Life-Cycle Project Experience. My expertise are right from installation, configuration and post-golive support. I've produced number of deliverables at various stages of the projects. I wanted to start off this blog to help my fellow SAP Basis people to get around with those small nagging issues which i've faced during my projects. I hope you would all enjoy and learn something through this blog.
Wednesday, January 4, 2012
Wednesday, August 17, 2011
Install Apache Tomcat 6.0.32 (Linux)
1) Download the Tomcat software from the location below,

2) Login to Putty and sudo to user "otxuser" (used to run application) and makesure JAVA_HOME environment variable is setup.


3) Change the permission of the file downloaded to be executable.
# chmod a+x apache-tomcat-6.0.32.tar.gz
4) Change to the directory in which Tomcat is to be installed.
# cd /home/otxuser
5) Run the self-extracting binary.
# tar xvfz apache-tomcat-6.0.32.tar.gz
6) Tomcat is installed into its own directory.
Path: /home/otxuser/apache-tomcat-6.0.32

7) Adapt the default Port Number by editing
/home/otxuser/apache-tomcat-6.0.32/conf/server.xml.

8) Shutdown Tomcat
# ./shutdown.sh

9) Start Tomcat
# ./startup.sh

10) Confirm that tomcat is running by checking the process.
# ps –ef | grep tomcat

Monday, August 8, 2011
Add remote Oracle Database in DBACOCKPIT
Follow the below steps to add a remote oracle database in DBACOCKPIT.
Steps:
1. Update the tnsnames.ora file at the below locations,
Application Server of System A:
2. Make sure tnsping QE1 is working fine from the database server & application server (if full oracle client is installed - if only instant client is installed then tnsping would not be available),
orads1> tnsping QE1
TNS Ping Utility for Linux: Version 11.2.0.2.0 - Production on 08-AUG-2011 20:52:28
Copyright (c) 1997, 2010, Oracle. All rights reserved.
Used parameter files:
/oracle/DS1/112_64/network/admin/sqlnet.ora
Used TNSNAMES adapter to resolve the alias
Attempting to contact (DESCRIPTION = (ADDRESS_LIST = (ADDRESS = (COMMUNITY = SAP.WORLD) (PROTOCOL = TCP) (HOST = <hostname>) (PORT = <listener_port>))) (CONNECT_DATA = (SID = QE1) (GLOBAL_NAME = QE1.WORLD)))
OK (10 msec)
orads1>
3. Goto transaction DBACOCKPIT in System A (DS1), Click the DB Connection on the left.
4. Enter the below details,
Connection Name - Should auto populate from previous screen
Database system - Oracle (Select from drop down)
Connection Maximum - 0
Connection Optimum - 0
User Name - SYSTEM
Password - <SYSTEM User Password>
Confirm - <Same as above>
Enter TNS NAME - SID or the connection string.
Click Save.

Click Save again
5. Connection to remote database is complete.
Scenario:
System A wants to have the database information of System B added in DBACOCKPIT (System A).System A – DS1
System B – QE1
Steps:
1. Update the tnsnames.ora file at the below locations,
Application Server of System A:
/usr/sap/DS1/SYS/profile/oracle
&
Database Server of System A:
/oracle/DS1/112_64/network/admin
QE1,QE1.WORLD=
(DESCRIPTION =
(ADDRESS_LIST =
(ADDRESS =
(COMMUNITY = SAP.WORLD)
(PROTOCOL = TCP)
(HOST = <hostname>)
(PORT = <listener_port>)
)
)
(CONNECT_DATA =
(SID = QE1)
(GLOBAL_NAME = QE1.WORLD)
)
)
2. Make sure tnsping QE1 is working fine from the database server & application server (if full oracle client is installed - if only instant client is installed then tnsping would not be available),
orads1> tnsping QE1
TNS Ping Utility for Linux: Version 11.2.0.2.0 - Production on 08-AUG-2011 20:52:28
Copyright (c) 1997, 2010, Oracle. All rights reserved.
Used parameter files:
/oracle/DS1/112_64/network/admin/sqlnet.ora
Used TNSNAMES adapter to resolve the alias
Attempting to contact (DESCRIPTION = (ADDRESS_LIST = (ADDRESS = (COMMUNITY = SAP.WORLD) (PROTOCOL = TCP) (HOST = <hostname>) (PORT = <listener_port>))) (CONNECT_DATA = (SID = QE1) (GLOBAL_NAME = QE1.WORLD)))
OK (10 msec)
orads1>
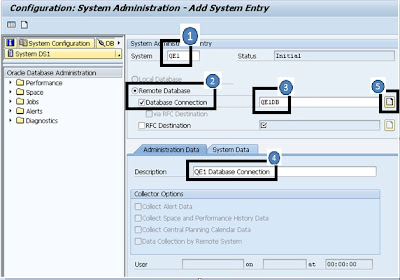
3. Goto transaction DBACOCKPIT in System A (DS1), Click the DB Connection on the left.

Enter System ID
Select Database Connection
Enter a name for the Database Connection
Enter the description for Administration Data
Click the Create Button next to Database Connection Name.
4. Enter the below details,
Connection Name - Should auto populate from previous screen
Database system - Oracle (Select from drop down)
Connection Maximum - 0
Connection Optimum - 0
User Name - SYSTEM
Password - <SYSTEM User Password>
Confirm - <Same as above>
Enter TNS NAME - SID or the connection string.
Click Save.

5. Connection to remote database is complete.
Saturday, July 30, 2011
Add Custom Logo to SAP Initial Screen
Goto transaction SMW0.
Select "Binary Data for WebRFC Application"

Click
Execute (F8) without entering anything on the resulting screen.

Settings -> Maintain MIME Types and Create an entry for the Extension of the Image to be uploaded.

Click

Enter an Object Name and its Description.
 Click
Click and Browse for the Logo.


Goto Transaction /nSM30 or /nSM31 and Enter Table Name SSM_CUST and Click MAINTAIN.

Make an entry as below for START_IMAGE with the name of the Object created in SMW0.

Login to SAP and look for the uploaded Logo.

Select "Binary Data for WebRFC Application"
Click
Execute
(F8) without entering anything on the resulting screen.
Settings -> Maintain MIME Types and Create an entry for the Extension of the Image to be uploaded.

Click
Enter an Object Name and its Description.
and Browse for the Logo.Save it as Local ($tmp) or in one of the Project Packages.
Goto Transaction /nSM30 or /nSM31 and Enter Table Name SSM_CUST and Click MAINTAIN.

Login to SAP and look for the uploaded Logo.

SSO to CRM WebUI with user credentials of SAP GUI
Follow the below steps to implement the SSO to CRM WebUI via, SAPGUI for Windows.
1) Implement Note: 1467488
With this note the ABAP report BSP_WD_APPL_STARTER gets an additional checkbox which enables the single sign-on mechanism. The SAP GUI user credentials will be used for the WebClient UI session as well.
This note has got the following manual steps to be performed.
TCode: SE38
Program: BSP_WD_APPL_STARTER
Goto -> Text Elements -> Text Symbols
Create the text symbol 009.
Short Text: Single sign-on
Activate your change.
TCode: SE91
Display the message of message class BSP_WD.
Create the message 027.
Short text in EN: The service '&1' is inactive. Use transaction SICF for activation
Save the message.
Once the above manual steps are performed, implement the SAP Note via, SNOTE.
2) Create a new variant ZSAP_CRMUI for the report BSP_WD_APPL_STARTER with the below settings,
BSP Application: CRM_UI_START
In Client: <xxx>
New Browser Window: <Check Mark>
Single sign-on: <Check Mark>
3) Goto tcode SE93 to make the changes shown as below to CRM_UI transaction.
In the default Values section,
Name of Screen Field: D_SREPOVARI-VARIANT
Value: ZSAP_CRMUI
4) Make sure the below parameters are in place,
login/create_sso2_ticket = 2
login/accept_sso2_ticket = 1
Update SAP Kernel in Linux / Oracle
Prelimiary Steps:
1) Stop SAP
2) Kill all processes of SAP
3) Stop DB
Extract Kernel:
1) Location of Kernel SAR Files: /<Any Location>/Kernel_<xx>
2) Make directory to extract the Kernel files.
mkdir Kernel<xx>
3) ./SAPCAR –xvf DBATL<>_<>.SAR -R ./Kernel<xx>
4) ./SAPCAR -xvf SAPEXEDB_<>.SAR -R ./Kernel<xx>
5) ./SAPCAR -xvf SAPEXE_<>.SAR -R ./Kernel<xx>
Replace Kernel:
1) cp –af /<Any Location>/Kernel_<xx>/Kernel<xx>/* /sapmnt/<SID>/exe/
2) cd /sapmnt/<SID>/exe
3) ./saproot.sh <SID> [Note: Execute this as user root]
Start DB and then Start SAP.
If SAP won't come up try the solution provided below in the APPENDIX.
APPENDIX:
Make sure after the Kernel update all of the below locations are of same Patch Level.
LOCATION 1: /sapmnt/<SID>/exe
LOCATION 2: /usr/sap/<SID>/<Instance>/exe
You would have replaced the kernel at LOCATION 1, but the kernel at LOCATION 2 will still remain at old level which will prevent the access to database. So replace the kernel at LOCATION 2, and then try start SAP it should work.
Sunday, July 24, 2011
Assigns SLD Roles to Administrator Groups
a. Start the SAP NetWeaver Administrator.
http://<hostname>:5<nn>00/nwa
Where <nn> is Instance Number.
Choose Configuration -> Security -> Identity Management
Add SAP_SLD_ADMINISTRATOR role to SAP_J2EE_ADMIN group.


Add SAP_SLD_GUEST role to SAP_J2EE_GUEST group.


Add SAP_SLD_ADMINISTRATOR role to SAP_SLD_ADMINISTRATOR group.
Add SAP_SLD_GUEST role to SAP_SLD_GUEST group.
Execution of User Management
Create and assign PI dialog and service users.
User | Type | User Required for | Role |
PILSADMIN | System | Change Management Server | SAP_XI_CMS_SERV_USER |
PIDIRUSER | System | Integration Directory | SAP_XI_ID_SERV_USER |
SAP_XI_ID_SERV_USER_MAIN | |||
SAP_SLD_CONFIGURATOR | |||
SAP_BC_WEBSERVICE_PI_CFG_SRV | |||
PIREPUSER | System | Enterprise Services Repository | SAP_XI_IR_SERV_USER |
SAP_XI_IR_SERV_USER_MAIN | |||
SAP_SLD_CONFIGURATOR | |||
PILDUSER | System | System Landscape Directory | SAP_BC_AI_LANDSCAPE_DB_RFC |
PIAPPLUSER | System | sender applications | SAP_XI_APPL_SERV_USER |
SAP_BC_WEBSERVICE_PI_CFG_SRV | |||
PIRWBUSER | System | Runtime Workbench | SAP_XI_RWB_SERV_USER |
SAP_XI_RWB_SERV_USER_MAIN | |||
SAP_SLD_CONFIGURATOR | |||
PIAFUSER | System | Advanced Adapter Engine | SAP_XI_AF_SERV_USER |
SAP_XI_AF_SERV_USER_MAIN | |||
SAP_SLD_CONFIGURATOR | |||
SAP_BC_WEBSERVICE_PI_CFG_SRV | |||
PIISUSER | System | Integration Server | SAP_XI_IS_SERV_USER |
SAP_XI_IS_SERV_USER_MAIN | |||
SAP_SLD_CONFIGURATOR | |||
PISUPER | Service | Super user with authorization for all involved tasks | SAP_BC_AI_LANDSCAPE_DB_RFC |
SAP_BC_ALM_ADMIN | |||
SAP_BC_ALM_ALERT_USER | |||
SAP_BC_ALM_CUST | |||
SAP_BC_BASIS_ADMIN | |||
SAP_BC_BASIS_MONITORING | |||
SAP_BC_WEBSERVICE_ADMIN | |||
SAP_NWA_FULL | |||
SAP_SLD_ADMINISTRATOR | |||
SAP_XI_ADMINISTRATOR | |||
SAP_XI_BPE_ADMINISTRATOR_ABAP | |||
SAP_XI_BPE_CONFIGURATOR_ABAP | |||
SAP_XI_BPE_MONITOR_ABAP | |||
SAP_XI_CONFIGURATOR | |||
SAP_XI_CONTENT_ORGANIZER | |||
SAP_XI_DEVELOPER | |||
SAP_XI_MONITOR | |||
PI_JCO_RFC | System | RFC communication between ABAP and Java | SAP_BC_JSF_COMMUNICATION_RO |
PIPPUSER | System | Principal Propagation | SAP_XI_APPL_SERV_USER |
PICACHEUSER | System | Cache Update | PICACHEUSER |
SAP_BC_WEBSERVICE_PI_CFG_SRV | |||
PI3RDAPIUSER | System | User for calling a Java Web service and is used to set up point-to-point connections | SAP_XI_CONFIGURATOR |
SAP_XI_CONFIGURATOR_EXT_J2EE | |||
SAPJSF | Service | communication between AS ABAP and AS Java | SAP_BC_JSF_COMMUNICATION |
Subscribe to:
Comments (Atom)